
Brief Review
There are a couple of DIY methods to create CO2 for your aquarium, each one with its own pros and cons:
-
Baking Soda + Vinegar
The fastest, easiest and cheapest way to create CO2. However, it doesn't last long. Thus requiring constant intervention to keep the CO2 production. -
Yeast + Sugar
A little more complicated then the previous one, but still easy. The production last for some days, but is somewhat irregular. After some days, acid starts to buildup, which kills the yeast and stops the CO2 production. -
Yeast + Sugar + Baking Soda
The baking soda neutralizes the buildup of acid and increases the CO2 production. After some fine tuning, this method can last for 1-2 weeks and will only stop after the yeast have consumed all the sugar. However, the CO2 production is still somewhat irregular (a peak in the first few days followed by a fast decay). -
Yeast + Sugar + Baking Soda + Gelatin
The goal of the gelatin is to control the sugar consumption. It takes some trial and error to fine tune the proportions of the ingredients. You will notice that different manufacturers requires different proportions. However, after doing so, this is the method that can last longer (up to a month) with the steadiest CO2 production.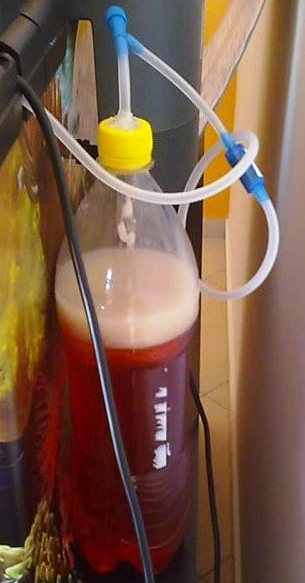
This article will discuss solely the 4th method for CO2 production. The delivery system into the aquarium and other production methods will be discussed in other articles.
First part: Gelatin
Materials Required
- 1 PET bottle of 2L (Coca-Cola, Sprite, 7Up, Mineral Water, …) well washed.
- 4 packets of common gelatin (any flavor).
- 1 cup of sugar, ±200gr.
- 1 teaspoon of baking soda.
Steps
- Prepare the gelatin according to the package instructions and, while still warm, add the cup of sugar and teaspoon of baking soda to dissolve.
- Put the mixture in the bottle and leave it in the refrigerator until the gelatin hardens. Do not use all the space available in the bottle. Leave enough space in the top area in order to add the second part of the recipe.
- Once the gelatin has harden, remove it from the refrigerator and leave it at room temperature.
Alternative
Some folks prefer a softer gelatin instead of hardened. That's up to each one taste, there is no right or wrong answer.
The tradeoff to care about here is very simple:
- Softer gelatin means the sugar will be consumed faster, therefore there will be a more pronounced peak in the CO2 production.
- Harden gelatin means a more steady CO2 production.
Second part: Fermentation
Materials Required
- 1 teaspoon of dehydrated organic yeast (sachet).
- 1 teaspoon of baking soda.
- 1 cup of sugar.
- 1L of warm water.
Steps
- Dissolve the organic yeast and baking soda in a small amount of warm water. Put it inside the bottle and watch the level. There should be a free space at the top in order to contain the foam that will form, about 10cm is great.
- Complete the bottle with warm water and screw the cap. The production starts in no time.
Attention
- Warm means really warm. If it is hot instead, the yeast will be killed and goodbye recipe.
- This mixture generates foam. Therefore you should never fill the bottle completely, otherwise there is a risk of such mixture getting into the aquarium.
- If you don't let the CO2 get out, the pressure will increase inside the bottle which can ultimately explode !!!
Budget Issues
Colorless gelatin sold in sheets is much more expensive than ready-made gelatin, for example:
- 1 sheet of colorless gelatin = $3.90
- 4 boxes of ready-made gelatin = $2.60
Also, colorless gelatin requires more sugar while the ready-one has already half the sugar needed.
Therefore, there is no reason (besides esthetics) to use colorless gelatin in this DIY.
Comments
> "The pressure is very low when we reduce the yeast."
hummm ... Don, your comment is somewhat puzzling:
Yeast multiply during fermentation. Therefore, the initial yeast concentration should only influence WHEN the CO2 production peak happens but not the AMOUNT produced.
Besides, very low pressure is a relative measurement. Tough to say whether is right or wrong.
Is the pressure sufficient at least to create bubbles inside the aquarium?
> "Using four will give me about 600 grams of sugar, which doesnt sound right."
Why do you think so? Seems fine to me.
> "how much total sugar should be in the recipe above?"
There is no definitive answer to this.
If there is too much sugar, one of the issues you may face would be too much acid buildup. In this case you will have to add more baking soda.
You need to find the right proportions that will balance your mix.
> "Can I use gelatin powder ?"
Yes, you can.
As long as it hardens, you should be fine.
This means you are creating CO2 too fast. Try reducing the amount of yeast.